


Light Painting for Landscape Photography
Photographing at night can be tricky, you have to be comfortable photographing in manual mode and understand how to use bulb mode.
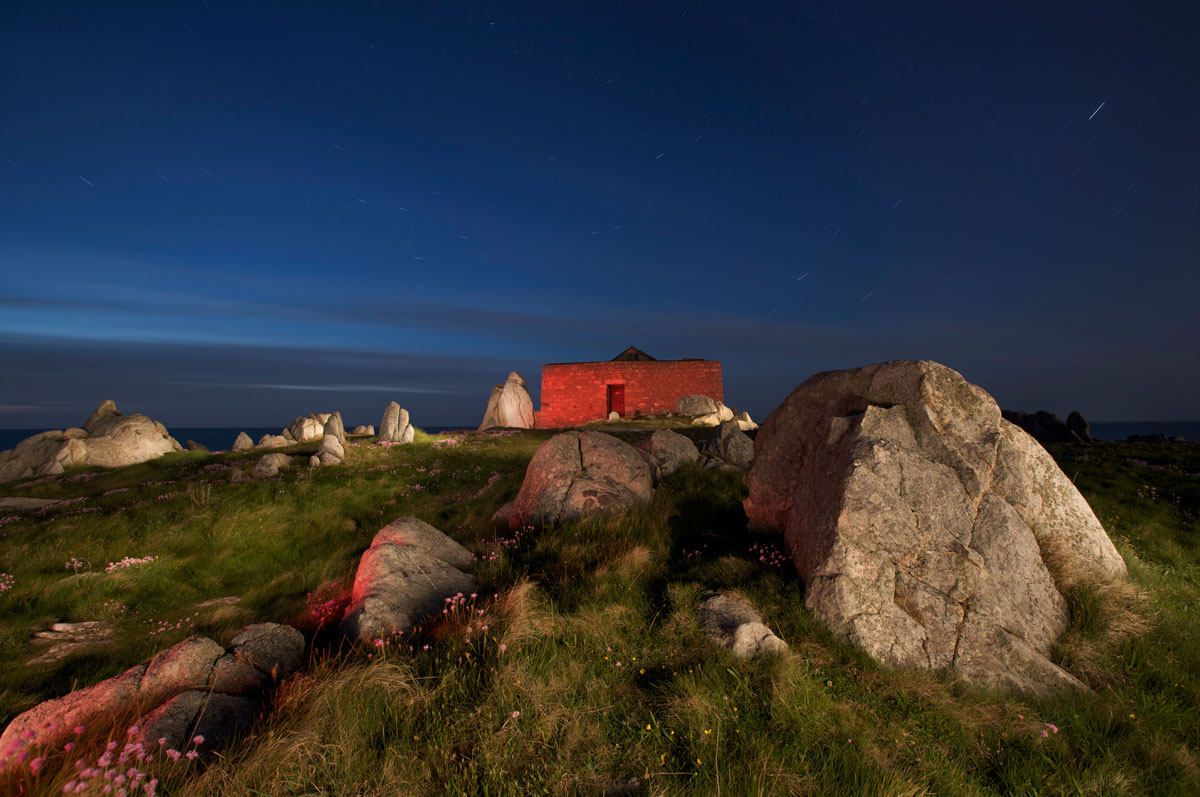
In this photography class, Karl takes you through each step of night photography. You’ll learn what settings are best to use, how to photograph stars trails and how you can use a torch to paint with light.
The skills you’ll learn in this class can also easily be transferred and applied to other types of photography, such as landscapes and architectural photography. Once you understand these techniques, you’ll soon find yourself using them time and time again.
In this class:
- Night photography tips
- Photographing star trails
- How to paint with light
- Composing and framing images
- Photographing using bulb mode
- Camera settings for night photography
- How to avoid camera shake during long exposures
If you enjoyed this class, be sure to watch Shooting Car Trails and Perfect Twilight Shots With Flash.
Questions? Please post them in the comments section below.
Comments
So cool seeing you applying this technique in the great outdoors 🙂 Back in 1993 we used the very same technique on some stills for a brochure for a fancy hotel (still have the brochures in my archive). Back then we borrowed the light from a dentist and it worked out very well. Ah, memories…
👍
This was amazing, but I have a question. Why doesn’t the camera capture you in the image even if you are moving rapidly.? Did you have to use any post production for moments that might have captured you?
Hi Paulo, no if you’re moving fast enough and it’s dark enough and you’re wearing relatively dark clothes it’s fine.
Great tutorial, love the final photo. Can this technique be used inside, on product photography?
Hi, yes in fact we are doing a show on this soon.
A beautifull tecnique that I didn’t know. Thank you and compliments from Italy!
Giuly
Ps subtitle are fundamental for me😜
This is so amazing. It’s like you create you own world in the real world. This is work is strongly sensitive and very expansive knowledge in photography. Thanks Karl.
Thank you.
Karl, I guess you are shooting at quite low ISO to get that length of exposure? I notice the star trails. I`ve done some astro photo`s with light painting using the 500 rule – tend to require multi positioned speedlights as the window of shutter is around 15s to avoid star trails, so a lot of trial and error with flash power.
Can you give a ballpark figure of ISO/Aperture/Shutter on this shoot and your thoughts behind that?
Hi Chris, generally back when we filmed this module I would stick to low ISO unless I couldn’t avoid it. These days with improvements in sensitivity I’m happier to go higher but as you mentioned you need lower ISO/longer time to capture trails and yes over 15 seconds on a wide angle and the stars start to show signs of movement. So it all depends on whether you want star trails or not as part of your composition. For example if I wanted to combine a high ISO shot to pull out the milkyway brightly and restrict the shutter speed to 15 seconds then we’d have a short window of time to paint with light and also the power of the light we paint with may have to be reduced. The only solution is to have more than one person painting or as you said carefully placed flashes ready to simultaneously do the painting for you or a combination of both. On the shot at the end of this particular module it said it was f8, 18mins ISO 100 also check out this module too https://visualeducation.com/class/star-trails-and-light-painting/
Thanks Karl, it certainly highlighted another aspect of night photography that I hadnt considered. I just didnt realise how much longer shutter time would be needed at 100ISO. I guess it is partly experimentation too.
Karl, for night photography I use a program called Stellarium installed on PC/Mac. You just put in the long/lat of the location and it gives the star/moon/planets/asteroids etc position for any given time (from anywhere in the solar system in fact but I mainly shoot from Earth). 🙂
It`s good for avoiding full moon or pre planning a trip months in advance.
Thanks Chris.
amazing Mr Taylor
is the option bulb mood available also in H6D
thank you
Hi Mohammad, yes it is.
Hello Mr. Taylor,
I just wanted to put a comment here that the pic is great and I wanted to present my work with light painting cause I’ve been doing it for a couple of years now but I cannot attach a file.
I would appreciate it a lot if you could take a look at some of my pictures and comment and I believe they will be interesting for the other students as well.
Hi Marin, you can post a link to a picture in the comments section but you can only post actual pictures in the forum.
Alright very good! The specific picture I wanted to hear comment on is more or less number four – the Vauxhall with the yellow smoke around it. I am sorry that I cannot upload the picture with a specific link but the following can be used as well:
http://4140photography.com/portfolio/gasoline-exhibition/
Thank you in advance!
It’s good but I find the yellow a bit garish, I prefer the steam roller above it in terms of the feel and the way the light is grazing the subject. These shots remind me of a photographer that I used to know called Steve Sharp he did a lot of amazing light painting work, check him out if you get the chance.
Great job Marin !
Thank You very much, Clemens! Some day it will become my dream job full time : )
Hi Karl,
As usually, very interesting and useful tutorial!
Can you please share what brand / model / features (lumen/candle/light color) of power torches you have been using?
Many thanks in advance!
Hey, can you help with doing the settings. How do we set the shot to 18 minutes? Bulb mode takes shot in around 30 seconds
Hi, bulb mode keeps the shutter open for as long as you keep the shutter button pressed down.
So someone have to hold the half button pressed for clock? I am confused on this
Hi, yes but there is usually a ‘lock’ button on the cable releases that you can purchase.
Hi Karl, not sure if you mentioned it, but what was you aperture setting?
Hi Rich, i’m not sure if I mentioned it either without watching the whole video, but I can tell you that given it is low light that I would probably only stop the aperture down to enough to get the depth of field i need or based on the amount of time I need to run around and paint the shot with light. F8 would be a good starting point as it is middle of the road for your first tests. Then check your DOF on the preview test shot and then see what shutter speed time that gives to run around painting. Depending on how much you have to paint then you may need more or less time. There are a number of variables including how much light there is from the moon, twilight etc that will all influence the result. I always take a few tests first to determine this.
Amazing!
Blown away!
Very cool!