


Movie-Style Mystery and Beauty
Harness the power of light to craft exceptional portraits.
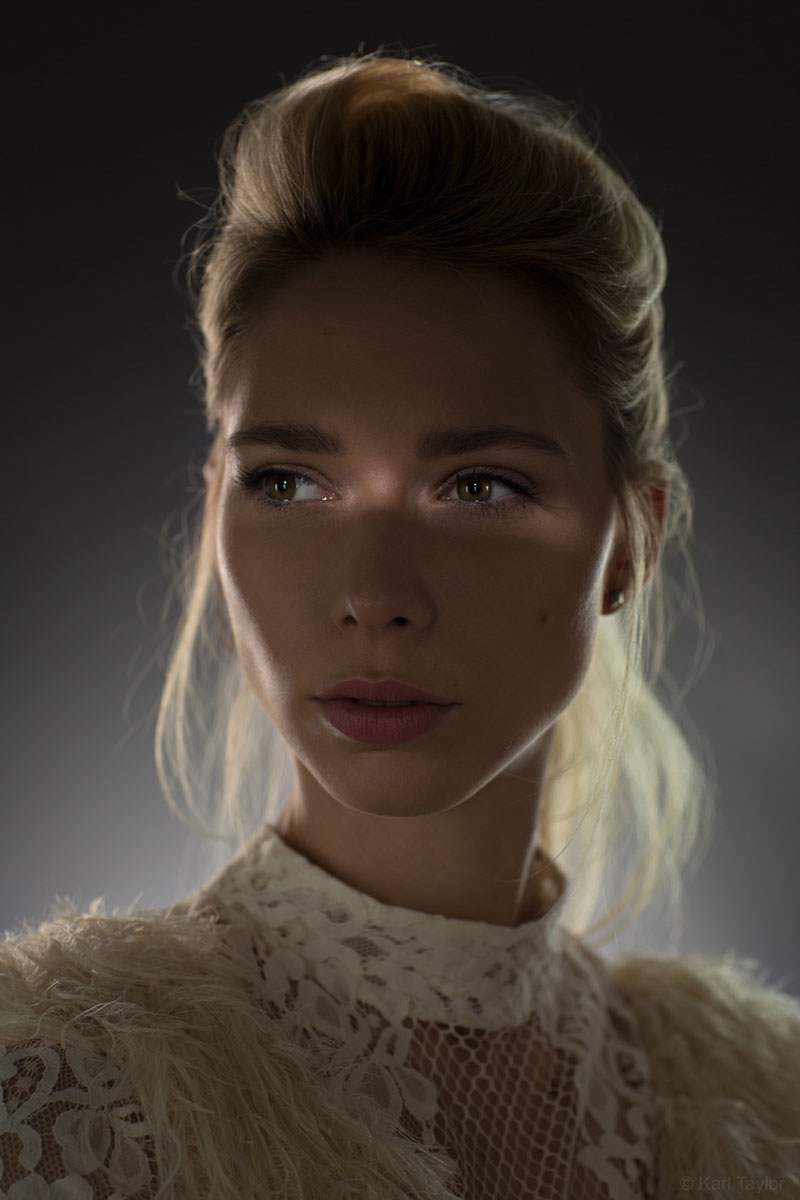
Ready for some four-light fun? In this step-by-step portrait photography class, professional photographer Karl Taylor shows you just how creative you can be with four studio lights – and how you can achieve stunning results, like the one below, straight out of camera.
You’ll watch Karl use four studio lights with basic modifiers (plus a few homemade ones too) to create this movie-style beauty image. Follow him from start to finish as he explains the key concepts and techniques applied throughout the shoot. This lighting setup requires precision, patience, control, and attention to detail – and the fabulous final result makes it all worthwhile!
In this class:
- Studio photography: How to shoot beauty images
- How to shoot creative portraiture using four lights
- How to control shadows
- Home made studio lighting modifiers
- Creative rim lighting studio setup
- How to use reflectors and flags for creative beauty photography
If you enjoy this class, check out Bright and Stylish.
Questions? Please post them in the comments section below.
Comments
Hi Karl. If use barn doors in this shoot? Whats will be different?
Hi Ventis, the shadows on the face would not be sharp enough because the light source they were next too was too close and too big.
Hello Karl.
What you need is about Eight hands haha. Thanks for doing these for the ones that are just starting out and only have a small kit of lights gives us inspiration that we too can achieve great results without having to break to bank to get that fifth light. I think at this time in my hobby it’s education that I would most benefit from vs getting more equipment. You make it all flow together like there is nothing at all to it. Many thanks for the knowledge and I hope you and the crew have a wonderful New Year in 2022.
Dear Karl,
Does all your studio lights double as flashes also. Can portrait shots be obtained with studio lighting and only one flash source. Only asking because I have a very limited budget. Super limited budget. After I obtain some kind of backdrop my next expense with be a studio light for that nice glow in the background.
Love your vids!
Mark
Hi Mark, yes they do, that is normal for studio lighting. Please watch this video – https://visualeducation.com/class/types-of-studio-lighting/
Your tutorial has taught me a lot of knowledge. Thank you very much. Will the live show also add subtitles? Looking forward to its appearance!
Hi Louie, we are currently working as fast as we can to add subtitles for other languages but it is a very time intensive task especially as we produce so much content it is hard trying to keep up. Unfortunately we currently don’t have a way of doing it any faster that is economically viable. We have completed most of the classes but not yet the live shows which the team are working on.
Subtitles are not displayed
This is one of the best portrait modules in your collection. I loved the trouble shooting aspect of using simple tools such as the silver reflectors, tape, cut outs etc to get this amazing shot. Thanks for providing us all with the wisdom of your professional experience. I feel like we are tapping into a lifetime of your hard earned work.
Thanks Derrick, much appreciated.
very nice
Amazing tutorial! So Happy I got a membership to this site!
Thank you Aous.
Hard work, beautiful result. Thank you, Karl.
Thank you.
This is an amazing 4 light demonstration!!. I love your trouble shooting skills, using what you had available and sticking to it until you got the shot. Very impressive.
Hello Karl. 22’49” “If I could use more (lights) the easiest way is to bounce another light into this polyboards” . Sorry if I mispelled something.
Hi Bogdan, yes remember each section in this course I restricted myself to using either 1, 2, 3, or 4 lights. So I was unable to use any more but if I was able to then I could have used them instead of the metal reflector.
Karl, hello again. At one point you said it can be easily done by adding the 5th light bounced on a larger surface. Wouldn’t that spill the light so it could surpass the shadow effect you made on the model’s face?
Hi Bogdan, can you give me the timecode so i know which part of the video you are referring to?
My favorite setup so far in portraiture .. The result is perfect. It also opens the imagination .. Thanks for this.
You’re welcome Natia, this was also a favorite of mine.
The more I see you work the more sense it makes not to use a light meter, it would be impossible to meter this shot to get anywhere near the same quality. I’m also realising just how little I knew beforehand, and how following some inferior “tutorials” has compromised my learning curve.
Thank you Mark and unfortunately I have to agree with you, there are many players who try to teach but have little real professional experience or proper understanding of the subject. I’ve spent many years formatting the delivery of my knowledge in a way that can be absorbed, understood and implemented and that’s why it is extremely rewarding for myself and the team to receive feedback like this. Cheers Karl and the team.
Hi Karl,
I really enjoyed this lesson how to overcome difficulties at the moment of clicking. Only this lesson was worth all the cost of the year. In this class I realized how the photographer has to be really multi task and, above all, be creative to get the results you want. Congratulations! Keep going like this, teaching how to be a good photographer!
Deborah was also a great role model. Patient and friendly. Congratulations to her too.
Hugs
Thank you Ilidio.